Power Automate is a service provided by Microsoft. It allows users to create automated workflows between their favorite apps and services to synchronize files, get notifications, collect data, and more.
A common use case for Power Automate is to generate Word documents automatically by populating word templates with data from third-party software. This capability is incredibly useful for businesses and individuals who need to create multiple documents with similar structure but different data, such as contracts, invoices, or reports.
The process of populating a Word document with Power Automate involves a workflow that triggers the generation of a document, retrieves the required data from various sources, and then inserts that data into the document.
Word Document Generation using Power Automate
Populating Word documents automatically leverages templates and predefined fields, streamlining the creation of consistent and error-free documents across various business processes.
Word templates serve as the foundation for document generation. They contain predefined formatting, text, and placeholders, which can be programmatically filled with dynamic content.
When these templates are prepared, they typically include:
- Structured Fields: Designated areas where dynamic content will be inserted.
- Static Content: Business logos, headers, footers, and standardized text.
- Formatting Styles: Consistent fonts, colors, and themes across documents.

When setting up a document template for Word document generation in Power Automate, it's crucial to have a consistent layout with properly inserted document fields. These fields act as placeholders that will be replaced by data during the automation process.
After adding the placeholders, the document should clearly display where dynamic data will populate. Save the document in a location that can be accessed by Power Automate, such as in OneDrive for Business or SharePoint.
Populate a Word Document Template with Power Automate and AutomatedDocs
This process involves using AutomatedDocs webhook data capture from PowerAutomate to populate an existing document template.
Templates serve as the foundation for generating documents with placeholders that can be automatically filled with real-user data.
This section guides you through the process of creating a new document template from a Microsoft Word document

- Click on the "Upload Word Template" button.
- In the dialog that appears, navigate to and select the Word document file you wish to use as a template.
- Ensure that your Word document contains tags (placeholders) formatted like
${variable_name}where you want dynamic content to replace static text. - Upload the document, and the system will process it into a template for future use.
Setup up webhook data capture
Webhooks provide a powerful way to automate document creation by allowing external applications to trigger actions within our system.
By configuring a webhook, you can set up an automated workflow that creates a new document every time a POST request is sent to your unique webhook URL with the required JSON payload.
You will be provided with a unique URL that our system will monitor for incoming POST requests:
- Locate the "Your Unique Webhook URL" section on the Webhook Configuration screen.
- Copy the provided URL to your clipboard.
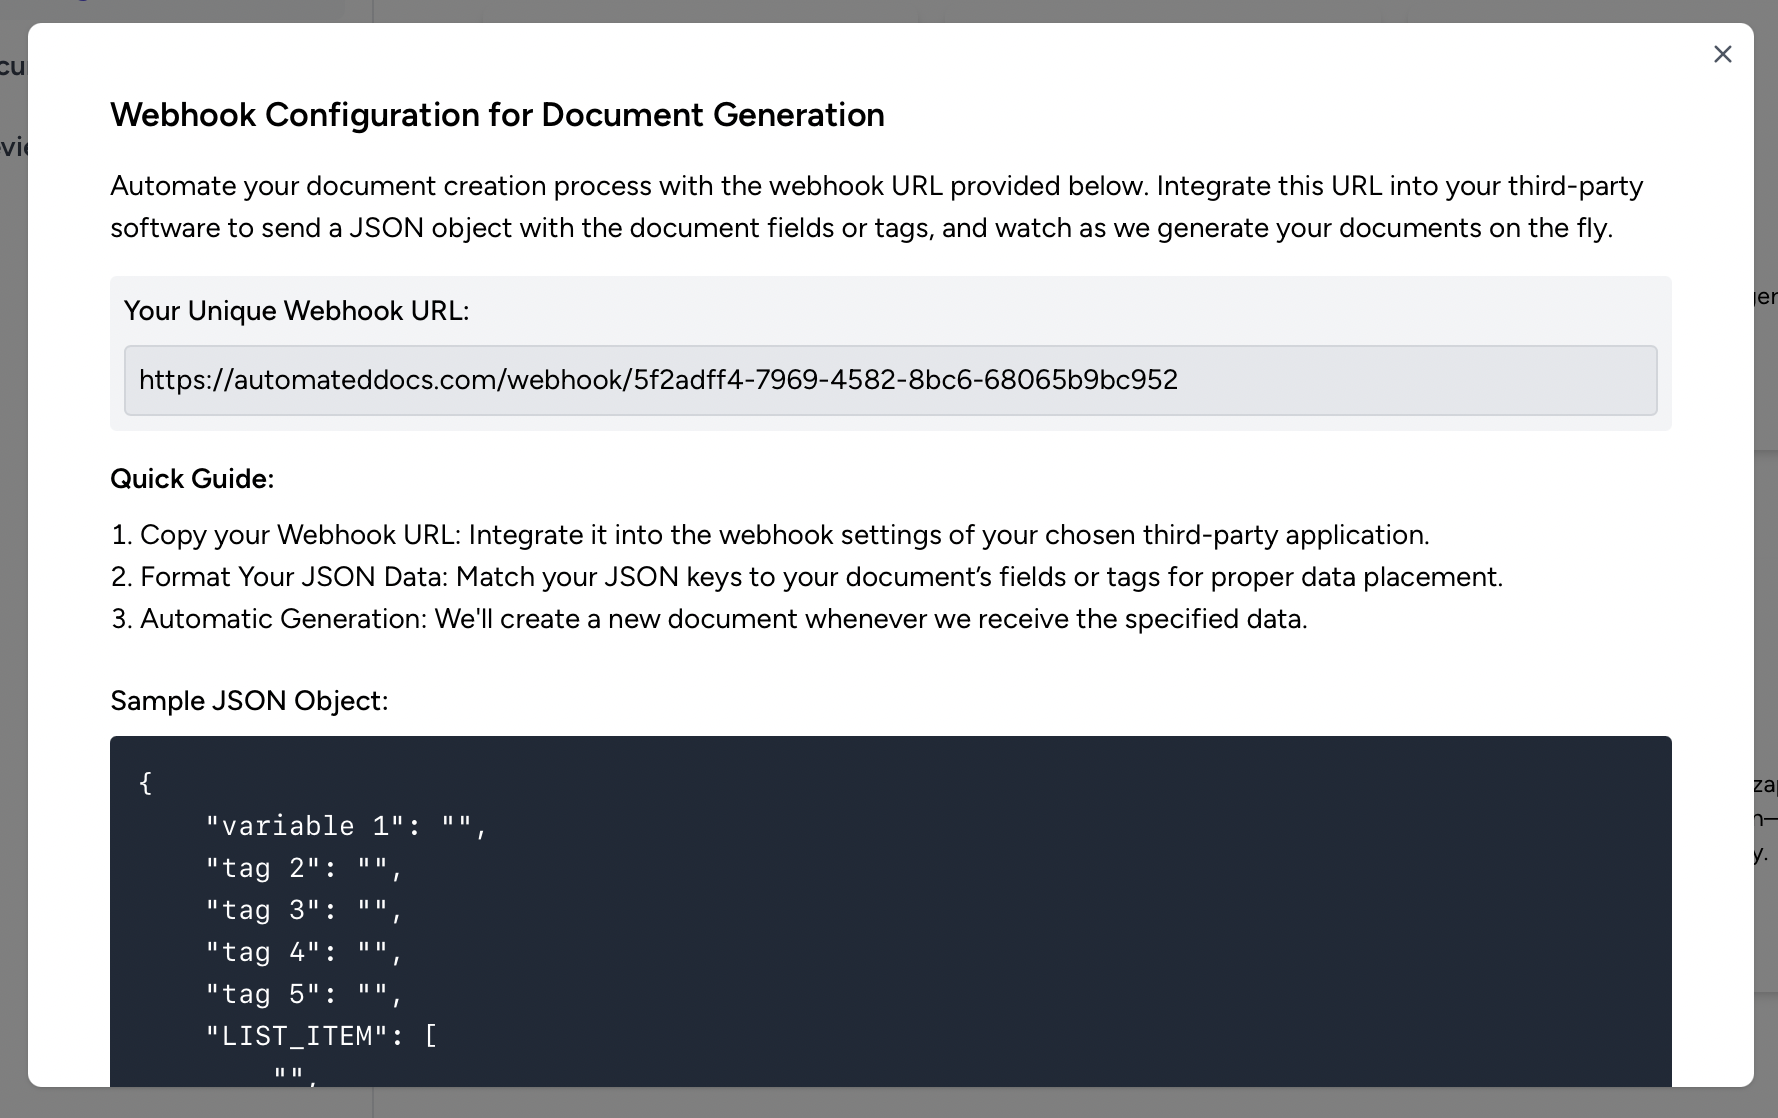
This URL is specific to your account and will be the endpoint that receives the JSON data to generate documents.
Save this URL for later, we will use it while creating a Power Automate flow to capture your MS Form response and create the PDF file from the Word template from the previous section.
Set up document Delivery
To streamline your document generation workflow and keep your files organized, AutomatedDocs enables you to automatically upload generated documents to multiple apps and third-party software like Email, OneDrive, and others. Just choose the desired destination and set up the integration.
Setting Up Power Automate
To populate a Word document using Power Automate, you need to configure a flow within the Power Automate environment that will automate the document generation process.
Creating a New Power Automate Flow
Begin by signing in to Power Automate and selecting Create from the left menu. Then, choose the appropriate flow type, which could be automated, instant, or scheduled, depending on the specific use case.
Adding Actions and Triggers
In a new flow, specify what triggers it, which is typically an event such as receiving an email or a new item entry in a SharePoint list. Then, add subsequent actions that the flow will execute, like fetching user details or processing data.
Using the HTTP action to make requests to generate your document
Incorporate an HTTP action to call a service that generates the Word document. You’ll need to configure the method (e.g., POST), the URI, and any headers or body content that the API expects.

Publishing Your Flow
After configuring and testing the actions within the flow, the user saves their changes and clicks "Publish" to make the flow live. Then, the flow becomes operational and runs according to the defined triggers and conditions.
So, we have seen that Power Automate can be used to populate a Word document template with data from a third-party software. This automation process can save you time and effort, allowing you to focus on more important tasks in your workflow.
Sign up for a free trial and experience firsthand how AutomatedDocs can transform your document creation workflow.
