Creating a Google Docs templates can save time and ensure consistency across documents, but still requires some manual tasks to fill those templates.
In this guide will explain the steps to automate Google Docs generations using third-party sources like Google Sheets to automated your workflow.
Users often need to generate documents with similar structure and content. Instead of copying and pasting, one can use pre-defined templates. Autopopulating these templates streamlines workflows, making it easier to manage and update information automatically.
This method is particularly useful for professionals who frequently handle reports, letters, or invoices. Implementing this workflow can drastically improve efficiency and accuracy, helping users focus on more critical tasks.
Google Docs Templates
Google Docs templates are pre-made documents that provide a formatted starting point. They save time and help maintain consistency across documents. Users can select a template and modify it to meet their needs.
Templates come in various types. Common ones include:
- Resumes
- Reports
- Invoices
- Meeting Notes
Usually have text, images, tables, and more and they serve as a blueprint for different kinds of documents.
Before you start, you'll need to be sure that your document template exists in Google Docs. That means you have to first create a Google Doc template.
Adding Placeholder Text
Placeholder text guides users on where to add their content. Use brackets or curly braces to indicate where text should be entered, like ${Name} or [Date]. Be clear and specific, so users understand what to input.

To make it easier, type the placeholder text and format it in a different color or italicize it. This helps distinguish placeholders from actual content.
Create a Google Sheet spreadsheet
If you wish to populate google sheets data, then you'll also need to set up a Google Sheets spreadsheet containing the data intended to replace the placeholders mentioned earlier. Be sure to create column headers that match the formatting and labels of the fields in your job offer document, but remember to remove the double braces.
Additionally, include some sample data. This will be useful later when you map the data from the spreadsheet to your template.
How to use Automated Docs to create a document from a template
AutomatedDocs simplifies document generation by combining templates with data from spreadsheet apps like Google Sheets. Follow these steps to create and populate a document template efficiently.
Upload Your Template
Start by creating a template in Google Docs or Word. This template acts as the framework for your document, including placeholders for data.
- Open your template document.
- Go to AutomatedDocs.
- Upload the template to the platform by following the on-screen instructions.

The placeholders in your template will be replaced with actual data during the automation process.
Connect Google Sheet with AutomatedDocs
We already have a ready-to-use sheet in Excel with the information that we wish to merge into our template.

To connect the sheet to our template, let's click on Data Integrations > Google Sheets

After choosing the sheet, we need to map each field in our invoice template to the corresponding sheet column.

Save Generated Document in a Google Drive Folder (Optional)
If we wish to also save the generated PDF in a Google Drive folder, from Template Settings, let's click on Document Deliveries and finally on Google Drive.
From here, we choose a folder within Google Drive to save the created PDF.

Use Webhooks as a data source.
Webhooks provide a powerful way to automate document creation by allowing external applications to trigger actions within our system.
By configuring a webhook, you can set up an automated workflow that creates a new document every time a POST request is sent to your unique webhook URL with the required JSON payload.
You will be provided with a unique URL that our system will monitor for incoming POST requests:
- Locate the "Your Unique Webhook URL" section on the Webhook Configuration screen.
- Copy the provided URL to your clipboard.
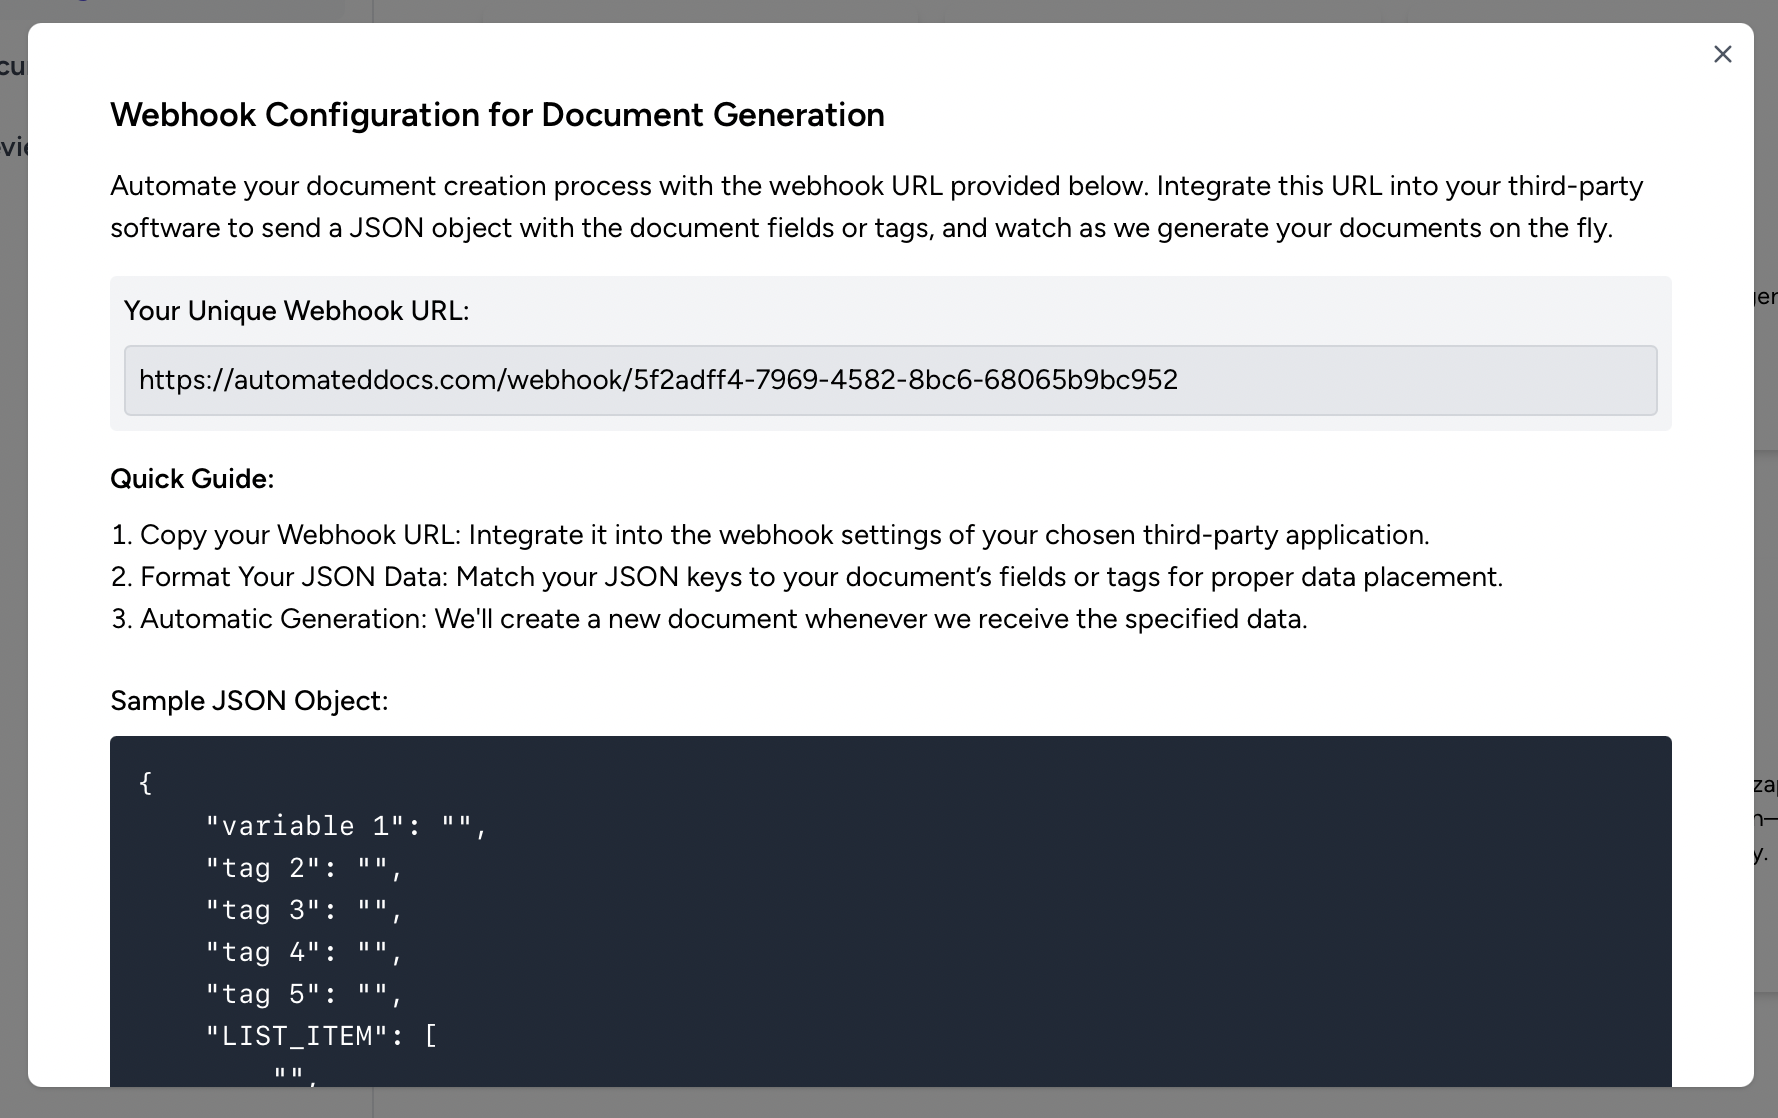
This URL is specific to your account and will be the endpoint that receives the JSON data to generate documents.
You can use webhooks in platforms like Zapier, Power automate, Make.com and much more.
By following these steps, you can streamline your document creation process with AutomatedDocs. The platform's integration capabilities and ease of use make it a powerful tool for efficient document generation.
How to use Zapier to create a document from a template
Another alternative to autopopulate Google Docs with data from Google sheets is using a third-party tool like Zapier.
This guide will walk you through the simple steps to set up a Zap that automatically generates Google Docs by replacing ${tags} in your template with the corresponding data from your Google Sheets.
Below we present you with a summary of the process but make sure to check Zapier website for a more in depth tutorial.
Step 1: Set Up Your Google Sheet
- Create a Google Sheet with the data you want to use. Ensure you have column headers that correspond to the
${tags}in your template. - Enter Some Sample Data in the rows below the headers.
Step 2: Prepare Your Google Docs Template
- Create a Google Docs Template that includes
${tags}where you want the data to be inserted (e.g.,${Name},${Position}, etc.).
Step 3: Connect Google Sheets to Zapier
- Sign in to Zapier at zapier.com.
- Click on "Create Zap" to start a new Zap.
Step 4: Set Up the Trigger
- Choose Google Sheets as the Trigger App.
- Select the Trigger Event: Choose
New or Updated Spreadsheet Row. - Connect Your Google Sheets Account: Follow the prompts to connect your Google Sheets account.
- Set Up the Trigger:
- Select the Google Sheets spreadsheet you created.
- Choose the specific worksheet within that spreadsheet.
- Test the Trigger: Zapier will fetch a sample row from your Google Sheet to ensure the connection is working.
Step 5: Set Up the Action
- Choose Google Docs as the Action App.
- Select the Action Event: Choose
Create Document from Template. - Connect Your Google Docs Account: Follow the prompts to connect your Google Docs account.
- Set Up the Action:
- Choose the Google Docs template you prepared earlier.
- Map the
${tags}in your template to the corresponding columns from your Google Sheet. For example, map${Name}to the "Name" column in your sheet.
- Test the Action: Zapier will generate a document using the sample data from your Google Sheet to ensure everything is set up correctly.
Step 6: Turn on Your Zap
- Name Your Zap: Give your Zap a meaningful name.
- Turn on the Zap: Toggle the switch to enable your Zap.
Step 7: Verify and Use
- Add Data to Your Google Sheet: Each time you add a new row of data to your Google Sheet, the Zap will automatically create a new Google Doc based on the template, replacing the
${tags}with the data from the sheet. - Check Your Google Docs: Look at the Google Docs folder to see the newly generated documents.
That's it! You've set up a Zap to automate the creation of Google Docs based on data from a Google Sheet.
Using Google Apps Script for Autopopulation
Google Apps Script is a powerful tool that can automate tasks in Google Docs. It allows users to write code that interacts with Google services.
Google Apps Script is a cloud-based scripting language based on JavaScript. It enables users to extend Google Docs and other Google services. You can automate repetitive tasks or create custom functions.
An important feature is its integration with other Google services like Google Sheets, Drive, and Gmail. This makes it incredibly powerful for various use cases. For instance, you can pull data from a Google Sheet and insert it into a Google Docs template.
Another benefit is that it is free to use with a Google account. There are plenty of resources and documentation available to get started, so even beginners can quickly learn how to use it.
Script Editor Basics
To write your first Google Apps Script, you need to access the Script Editor. Open Google Docs, click on "Extensions," then "Apps Script." This will open a new window with the Script Editor.
The Script Editor interface is straightforward. On the left, there is a project file structure. The main coding area is in the center, where you will write your script.
Scripts are organized within "functions." Each function performs a specific task. The editor also provides built-in debugging and logging tools to help you troubleshoot your script. Make sure to frequently save your work by clicking the floppy disk icon or using Ctrl + S.
Writing a Simple Autopopulate Function
Creating an autopopulate function involves writing a script that fetches data and inserts it into a Google Docs template.
Start by defining your function:
function autopopulateDoc() {

  var doc = DocumentApp.openById('your-doc-id');

  var body = doc.getBody();

}
Next, access the data source, like a Google Sheet:
var sheet = SpreadsheetApp.openById('your-sheet-id').getActiveSheet();

var data = sheet.getRange('A1:B10').getValues();
Loop through the data to insert it into the document:
for (var i = 0; i < data.length; i++) {

  body.appendParagraph(data[i][0] + ': ' + data[i][1]);

}
This simple function pulls values from a Google Sheet and adds them as paragraphs in the Google Doc. You can customize it further based on your needs.
Conclusion
In conclusion, automating the creation and population of Google Docs templates can greatly enhance your productivity and ensure consistency across your documents.
By leveraging tools like Zapier and Google Apps Script, you can streamline your workflows and reduce the manual effort involved in document generation.
However, if you're looking for an even more efficient and user-friendly solution, consider trying AutomatedDocs. This no-code platform simplifies the process of merging data from Google Sheets with your document templates, offering seamless integration and powerful automation capabilities.
Give AutomatedDocs a try to experience a more efficient way to manage and generate your documents.
