Microsoft Forms is a versatile tool that allows users to create surveys, quizzes, and polls, making the collection and analysis of data straightforward and efficient. One challenge users may face is exporting and storing these responses in a format that is easily accessible and presentable, such as a PDF. This is where Power Automate comes into play, providing a solution for automating the process of converting Microsoft Forms responses into a PDF file.
Power Automate, a part of the Microsoft Power Platform, enhances productivity by automating repetitive tasks and integrating various services. By using Power Automate, one can streamline the process of saving Microsoft Forms responses by setting up a flow that automatically generates a PDF document each time a new response is submitted. This ensures that data from forms is not only collected but also archived in an organized and consistent manner.
Using Microsoft Forms
Microsoft Forms allows users to create, share, and analyze surveys seamlessly. This section guides users through the process of setting up their form before integrating it with Power Automate for PDF saving of form responses.
Creating Your Form
To begin creating a form in Microsoft Forms, one must navigate to the Microsoft Forms website and sign in with their Microsoft account. Upon accessing the dashboard, users can click on New Form to establish a fresh form. A title can be assigned, and an optional description can be added to provide respondents with context.
Defining Form Questions
Once the form canvas is ready, the creator can add questions by selecting Add New to the form. Microsoft Forms offers various question types:
- Choice: For multiple-choice questions.
- Text: For open-ended responses.
- Rating: To collect opinions using stars or numbers.
- Date: To request a date input.
Each question can be marked as required by toggling the Required switch, ensuring that respondents cannot submit the form without answering.
Customizing Form Settings
Microsoft Forms provides customization options to tailor the form to users' needs. They can access Settings to adjust who can respond to the form and whether multiple responses are permitted. Some key settings include:
- Who can fill out this form: Options include
Only people in my organizationorAnyone with the link. - Record name: Decide if the respondents' names should be recorded.
- One response per person: Limit form submissions if necessary.
- Email notification for each response: To get alerts when the form is filled.
By following these steps and utilizing the settings offered, one can ensure that their Microsoft Forms is set up to gather responses effectively before proceeding to save them in PDF format using Power Automate.
Introduction to Power Automate
Power Automate, a service by Microsoft, is engineered to streamline workflow creation, enhancing productivity within a business or organization by automating repetitive tasks.
Power Automate, formerly known as Microsoft Flow, is a component of the broader Microsoft Power Platform.
This service enables users to create and automate workflows and tasks across various applications and services without the need for in-depth coding knowledge. It integrates seamlessly with Microsoft's suite of products like Forms, Office 365, SharePoint, and third-party applications, making it a versatile tool for automating operations.
By using Power Automate, businesses save time, reduce human error, and ensure consistency in tasks. It acts as a bridge that connects disparate systems, allowing for more streamlined communication and data exchange across platforms.
Set up a Documents Template
Templates in AutomatedDocs utilize a versatile tagging system to insert dynamic content into your documents. Understanding how to use these tags and fields will allow you to create complex documents that automatically populate with the appropriate data.
This section guides you through the process of creating a new document template from a Microsoft Word document. Templates serve as the foundation for generating documents with placeholders that can be automatically filled with real-user data.

- Click on the "Upload Word Template" button.
- In the dialog that appears, navigate to and select the Word document file you wish to use as a template.
- Ensure that your Word document contains tags (placeholders) formatted like
${variable_name}where you want dynamic content to replace static text. - Upload the document, and the system will process it into a template for future use.
Setup up webhook data capture
Webhooks provide a powerful way to automate document creation by allowing external applications to trigger actions within our system. By configuring a webhook, you can set up an automated workflow that creates a new document every time a POST request is sent to your unique webhook URL with the required JSON payload.
You will be provided with a unique URL that our system will monitor for incoming POST requests:
- Locate the "Your Unique Webhook URL" section on the Webhook Configuration screen.
- Copy the provided URL to your clipboard.
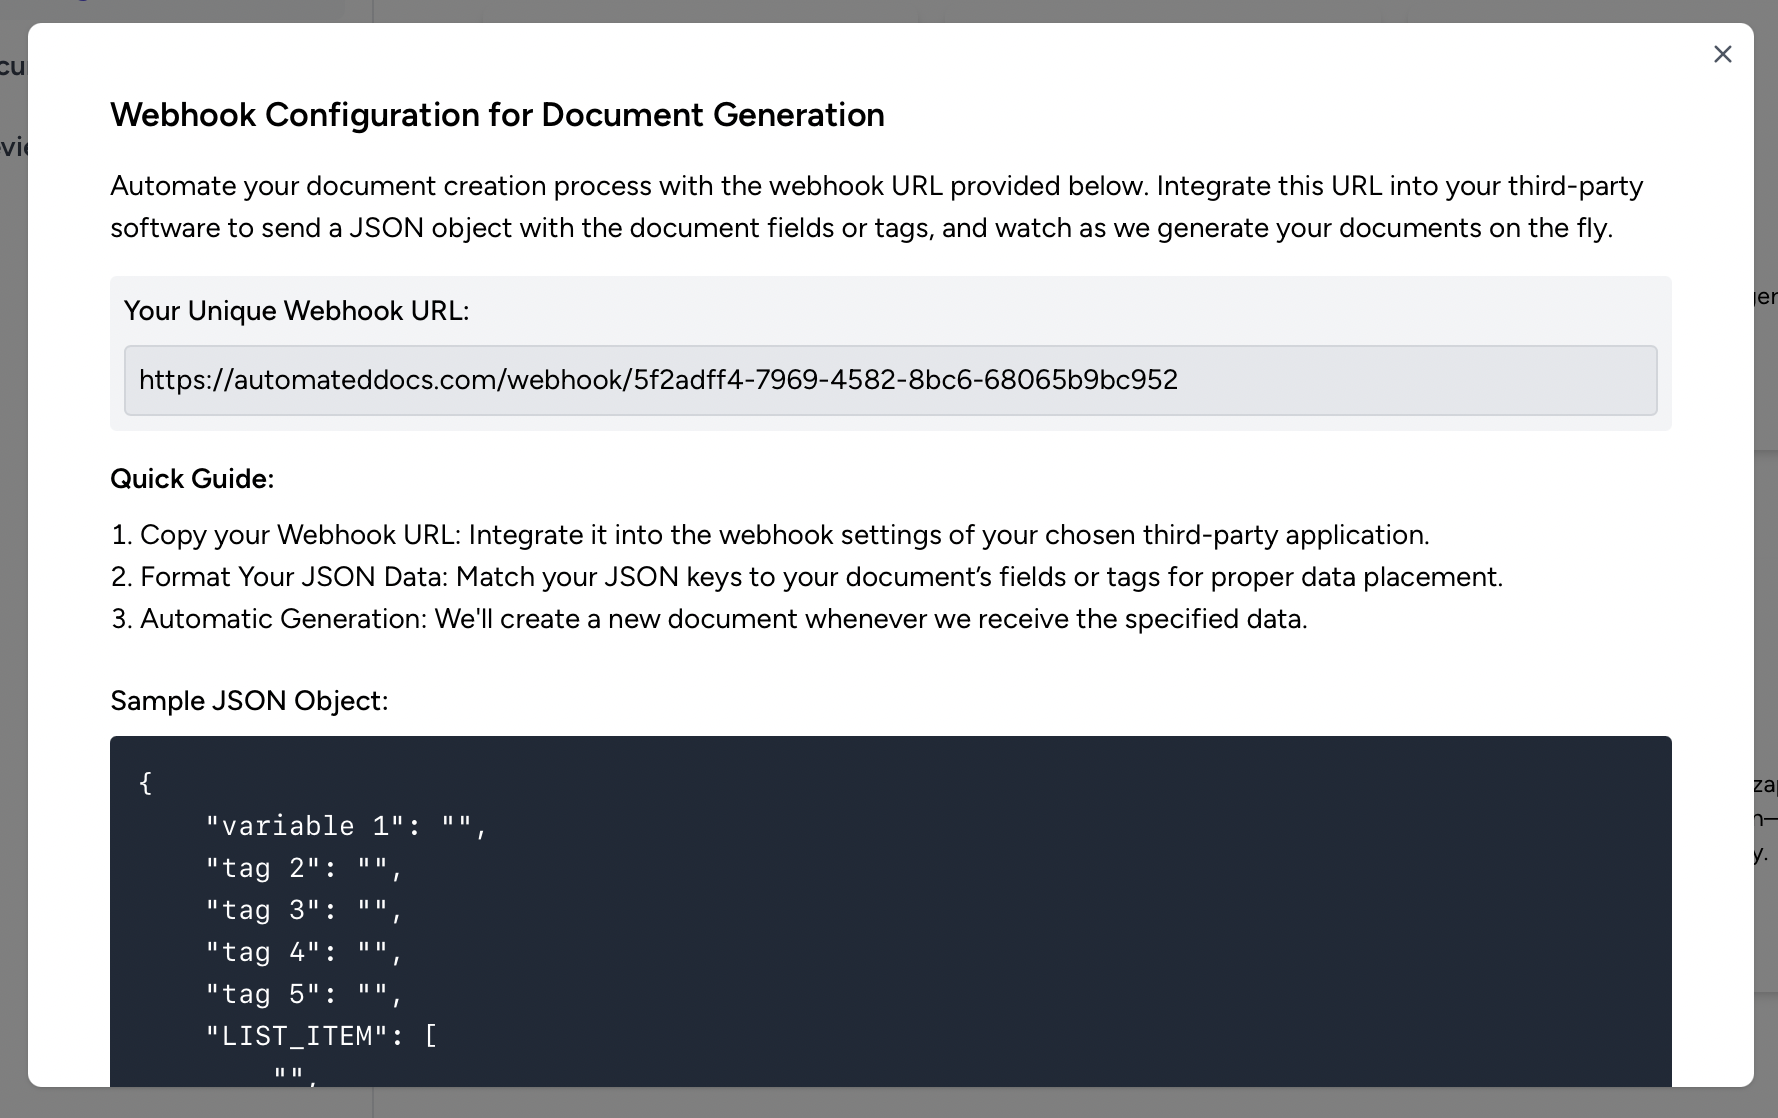
This URL is specific to your account and will be the endpoint that receives the JSON data to generate documents.
Save this URL for later, we will use it while creating a Power Automate flow to capture your MS Form response and create the PDF file from the Word template from the previous section.
Set up document Delivery
To streamline your document generation workflow and keep your files organized, AutomatedDocs enables you to automatically upload generated documents to multiple apps and third-party software like Google Drive, OneDrive, and others. Just choose the desired destination and set up the integration.
What Are the Steps for Saving Microsoft Forms Responses in PDF Using Power Automate
With Microsoft Power Automate, you can easily create a flow that will automatically convert your Microsoft Forms responses to PDF. To achieve this, you need to first create a flow that triggers when a new response is submitted. This can be done by adding the "When a new response is submitted" trigger in Power Automate. Next, you can use the "Get response details" action to collect the response details. Then, using the appropriate actions, such as the "Use HTTP Action" actions, we will use AutomatedDocs to generate your PDF document.
The complete flow would look similar to this

Creating a New Power Automate Flow
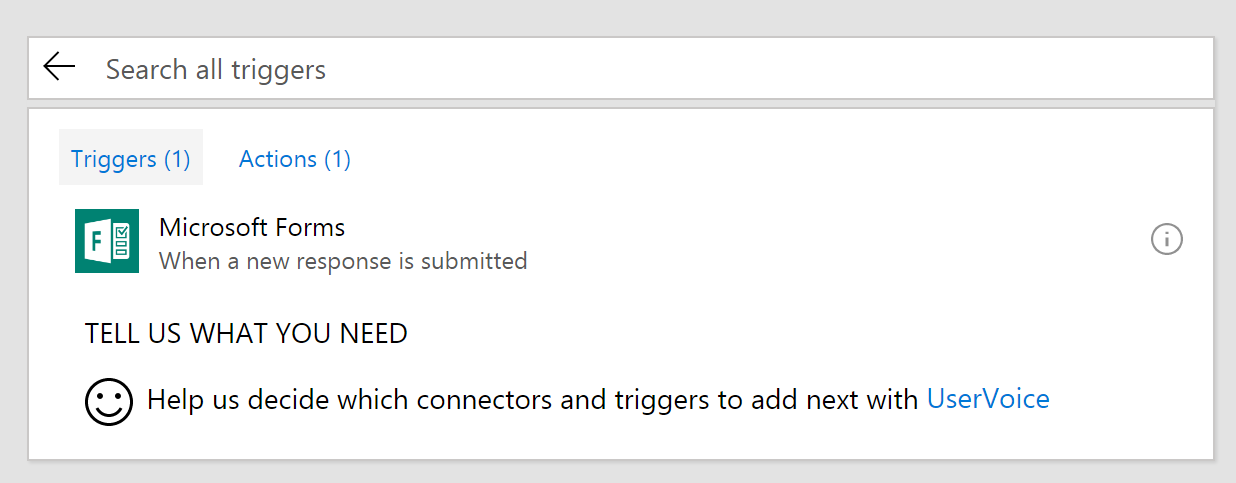
To get started with a flow that is triggered from Microsoft Forms, select Create from blank on your My Flows page. Then, select Search hundreds of connectors at the bottom of the screen. This will give you a list of the 170+ different triggers that Microsoft Flow supports. Search for Microsoft Forms to find the right trigger:
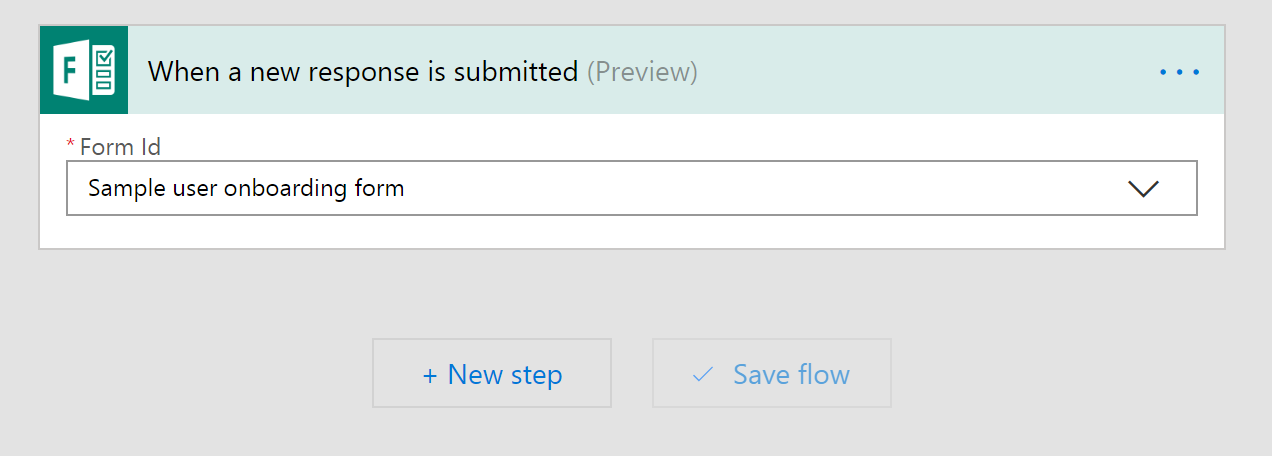
Once you have selected the trigger, you will need to pick which form you want to start this flow. Select the dropdown under Form Id and you should see a list of all of the forms that you have created (you need to create the form before you can use it in a flow).
Now you have set up the trigger. However, to be able to use the data inside your flow, you now have to add a new action.
Getting the response data
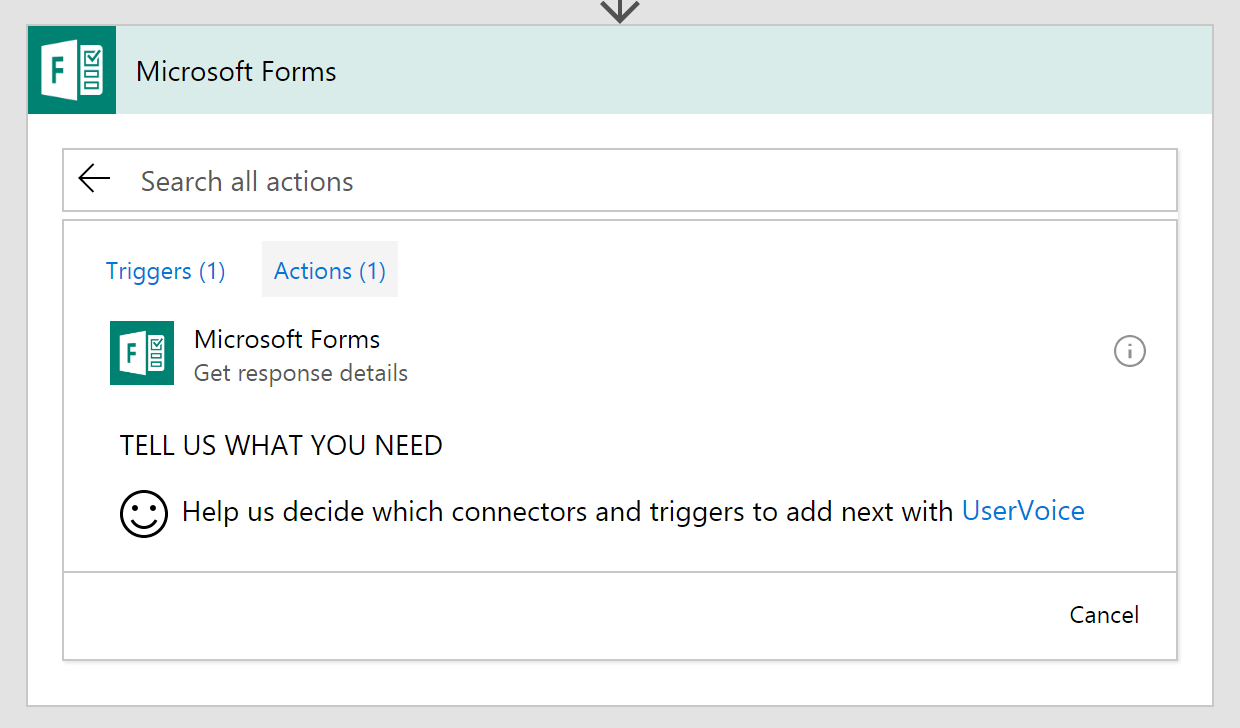
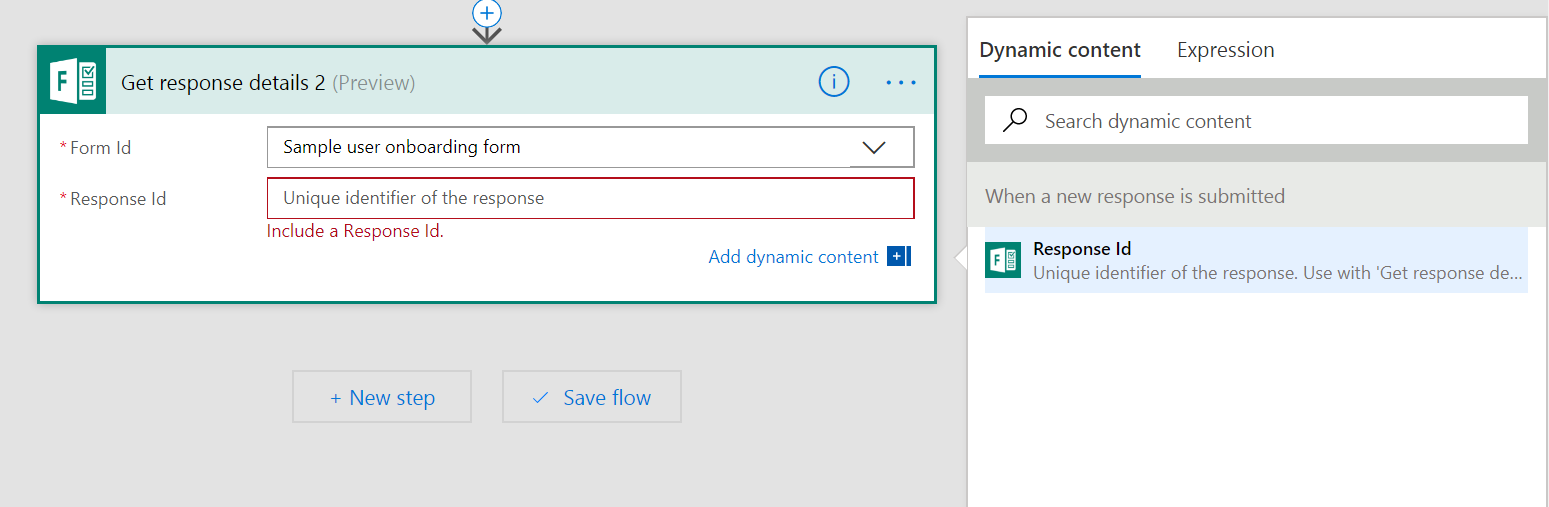
If all you want is a notification that there has been a response, you don't need to actually get the data that was submitted in the form. However, if you want to save the response data somewhere else, such as in a SharePoint list or a spreadsheet, you'll need to add a new action. To find the action, select New step, Add an action and then search for Microsoft Forms. You will see the action Get response details.
On this action, you'll need to select the same Form Id that you used in the trigger. Then, click in the Response Id text box, you'll see the Dynamic content menu pop up:
Using the HTTP action to make requests to generate your document
After collecting the form responses, we have to use the HTTP action to push the data into your document template webhook URL to generate the PDF Document
Just make sure to map the JSON of the body with the JSON object you can get from your Automated Docs template settings screen, and you are ready to go.

By following these steps, you can easily create a PDF document from a new Microsoft Form submission using PowerAutomate and AutomatedDocs. This automation process can save you time and effort, allowing you to focus on more important tasks in your workflow.
